(notes for this Sunday's Contemplative Service)
Two weeks ago in the Contemplative Service we handed out cards with names on them. The names were drawn randomly from various sources, all the names were real people from around the world. We were encouraged to pray for these people. We did not know them, did not know how to pray for them, and would not ever know how our prayers were answered.
Why did we do this? So many of us pray our own agendas when we pray. We tell God exactly what He should do and how He should do it. This exercise removed that possibility. All I could do was hold my two people out to God and pray that He would be with them in some way.
So Tom and Tam became my companions for a while, and I learned about openness and mystery in prayer. I surrendered my agendas and even allowed the way I pray for them to change how I pray for myself.
That same week my friend's five year old son Arthur had open heart surgery.
I tried to pray in the same way, to be open to the mystery of prayer and pray without expectations and agendas....and I couldn't do it. I got angry with the whole exercise. I told God in no uncertain terms exactly how I wanted Him to be with Arthur and how I wanted Him to make sure that Arthur's surgery was a success. Anything else felt like lying, I couldn't, wouldn't surrender the outcome of the surgery to God.
Arthur came through the surgery wonderfully well and is already back home.
I'm so grateful to God for that.....and I still find myself getting angry even imagining any other outcome.
I'm still wrestling with this issue of authenticity and openness.
How do I pray honestly for what I feel and still be open to the mystery of God and not become attached to the outcome? How do I pray in a way that feels honest about who I am and what I want, and acknowledges that ultimately I have to hold things loosely?
I've heard talks on the benefits of praying specifically. How articulating what you want to God helps you process and reflect on it. Be authentic to God, He knows when you are not anyway.
I've heard talks on the benefits of praying generally. How you should simply surrender the other person to God and be open to God doing whatever God wants.
In the midst of all this advice and suggestions, I find comfort from Jesus in the Garden.
"....Let this cup pass me by" is specific and authentic
"...not my will but yours be done" is a prayer of openness and surrender.
So this week I've tried to hold onto the tension of Openness and Authenticity. To ask God to help me find the place where they intersect, and when I get angry at the thought of what could have happened to Arthur, I try and place my anger in God's hands as well.
Showing posts with label Diary. Show all posts
Showing posts with label Diary. Show all posts
Thursday, August 21, 2014


Sunday, September 22, 2013
The Man Watching - Rainer Maria Rilke
I can tell by the way the trees beat, after
so many dull days, on my worried windowpanes
that a storm is coming,
and I hear the far-off fields say things
I can't bear without a friend,
I can't love without a sister.
The storm, the shifter of shapes, drives on
across the woods and across time, and the world looks as if it had no age:
the landscape, like a line in the psalm book,
is seriousness and weight and eternity.
What we choose to fight is so tiny!
What fights with us is so great.
If only we would let ourselves be dominated as things do by some immense storm,
we would become strong too, and not need names.
When we win it's with small things,
and the triumph itself makes us small.
What is extraordinary and eternal does not want to be bent by us.
I mean the Angel who appeared to the wrestlers of the Old Testament:
when the wrestlers' sinews
grew long like metal strings,
he felt them under his fingers
like chords of deep music.
Whoever was beaten by this Angel
(who often simply declined the fight)
went away proud and strengthened
and great from that harsh hand,
that kneaded him as if to change his shape.
Winning does not tempt that man.
This is how he grows: by being defeated, decisively,
by constantly greater beings.
Monday, May 28, 2012
Peter, Paul and Julie and Julia!
I first read the book Julie and Julia long before the movie appeared. I remember lying on a hotel bed in Seattle giggling over the chapter about euthanizing lobsters. I became interested in the Boeuf Bourguignon at the time but forgot about it until the movie came out. After watching the movie I printed out the recipe and decided that I would make it, but lost the printout when I moved house and the idea slipped into oblivion until a few weeks ago.
Knowing that some of the best cooking experiences are shared I called my culinary pal Paul and asked him to cook along with me.
Remove rind, and cut bacon into lardons. Simmer rind and bacon for 10 minutes in 1 1/2 quarts of water. Drain and dry. Preheat oven to 450 degrees
First problem, locating a 6 oz chunk of bacon for making lardons. Paul and I went to Revival Market in town and told them what we were doing and they presented us with a vacuum packed packet of lardons. There was slightly more than the recipe called for, but everything is better with extra bacon right? Second problem. The rind was all cut together in the lardons and would have taken forever for us to trim each piece. Never mind, into the pot it went to simmer....we weren't sure why we were simmering (and Julie Powell thinks this step is superfluous) but into the water it went, and quickly the kitchen smelled yummy.
Saute the bacon in the oil over a moderate heat for 2 to 3 minutes to brown lightly. Remove to a side dish with a slotted spoon. Set casserole aside. Reheat until fat is almost smoking before you saute the beef.
Third problem. We didn't notice that although you simmer the bacon lardons and the rind, when it comes time to saute it you only saute the bacon and not the rind. Ours was still attached. Oh well on we go.
Dry the beef in paper towels; it will not brown if it is damp. Saute it, a few pieces at a time, in the hot oil and bacon fat until nicely browned on all sides. Add it to the bacon.
 Behold the beef!
3lbs of either rump pot roast, chunk pot roast, top round or bottom round. Again, not cuts that were easily available. We talked with the helpful butcher at Revival market and he gave us a wonderful slab of prime cow.
I carefully took a ruler to make sure that the cubes were 2-inch cubes as specified by Julia in the recipe. They looked huge! This was far larger than most cubes of meat that you would put in a casserole. Never mind we thought we will get on YouTube and check the video of Julia Child teaching the dish to confirm.
Fourth Problem. There are many videos of people making Julia Child's recipe on YouTube, but none of them were Julia so we were unable to check with the source. After some frantic Internet searching we eventually located a clip of her that was hosted on a Russian Internet site...I'm kind of afraid what viruses my computer may have picked up, but we were determined to cook like Julia and not even the Cyrillic language would deter us!

Browning cubes of beef that large took forever but when mixed together with the bacon the aroma was wonderful and the dish was beginning to take shape.

While I tried to avoid splattering myself with hot bacon fat and oil. Paul masterfully wielded a knife over the vegetables. Only 1 onion and 1 carrot go in the pot. An amount that seemed remarkably small.

In the same fat, brown the sliced vegetables. Pour out the sauteing fat.

Return the beef and bacon to the casserole and toss with the salt and pepper. Then sprinkle on the flour and toss again to coat the beef lightly with the flour. Set casserole uncovered in middle position of preheated oven for 4 minutes. (This browns the flour and covers the meat with a light crust.) Remove casserole, and turn oven down to 325 degrees.
Stir in the wine, and enough stock or bullion so that the meat is barely covered. Add the tomato paste, garlic, herbs, and bacon rind. Bring to simmer on top of the stove. Then cover the casserole and set in lower third of preheated oven. Regulate heat so liquid simmers very slowly for 2 1/2 to 3 hours. The meat is done when a fork pierces it easily.
Fifth Problem. Julia's recipe may have been revolutionary at the time for its level of detail, but by today's standards it is frustratingly vague. It was difficult to tell at what point the vegetables were added to the beef and bacon. Should this be before the addition of the flour and the 4 minute bake or afterwards. As the only pot Julia mentions in her instructions is the fireproof casserole we assumed before, but it was at this stage we panicked because the recipe said add the rind, and of course it had been in there all along. Ooops!
 Sixth Problem. Well this time more of a curious puzzlement. The casserole is covered in the oven, and yet Julia instructs us to regulate the heat so the liquid simmers very slowly. Not the easiest of tasks. We debated about putting an oven thermometer into the fluid but that would have left the pot slightly uncovered causing more fluid to evaporate, plus we weren't very sure what the correct temperature for simmering a fluid of wine and broth was. We settled for checking it about every 30 minutes.
At this stage in the recipe you would think that you could put up your feet and finish the rest of the bottle of wine you have just opened, but no! Julia Child has us use our time by preparing Champignons Sautes Au Beurre and Oignons Glaces A Brun so that when the casserole has finished you can mix it all together.
 Place the skillet over high heat with the butter and oil. As soon as you see that the butter foam has begun to subside, indicating it is hot enough, add the mushrooms. Toss and shake the pan for 4 to 5 minutes. During their saute the mushrooms will at first absorb the fat. In 2 to 3 minutes the fat will reappear on their surface, and the mushrooms will begin to brown. As soon as they have browned lightly, remove from heat.
 Toss the shallots or green onions with the mushrooms. Saute over moderate heat for 2 minutes.
Seventh Problem. Hang on a second Julia. Do I finish sauteing the mushrooms first or do I add the shallots 2 minutes before they are ready? Solution. Get Paul to deal with the mushrooms while I work on the pearl onions...oh and if I remember it correctly I think we omitted the shallot as the recipe said it was optional :)
Julia calls for 18-24 peeled white onions about 1 inch in diameter. Determined to be as authentic as possible we scorned the prospect of frozen peeled pearl onions and purchased fresh. Bad idea. They took forever to peel!
When butter and oil are bubbling in the skillet, add the onions and saute over moderate heat for about 10 minutes, rolling the onions about so they will brown as easily as possible. Be careful not to break their skins. You cannot expect to brown them uniformly.

Having delegated the mushrooms to Paul, I figured I had better tackle the onions. The process was actually fairly simple though they were harder than imagined to get browned on all sides.
Pour in the liquid, season to taste, and add the herb bouquet. Cover and simmer slowly for 40 to 50 minutes until the onions are perfectly tender but retain their shape, and the liquid has evaporated. Remove herb bouquet.

Oh yes, we also made the bouquet garni ourselves. Our dedication to this recipe is getting ludicrous.


Eighth Problem - Well less of a problem, more like a mistake due to fatigue. Julia's recipe here calls for 1/2 cup of brown stock, or red wine. We had some of both left so we figured we would add both, but instead of adding 1/4 cup of each we inadvertently added 1/2 cup of each, doubling the amount of fluid! When we realized what we had done we just removed the cover from the onions early and prayed that the extra fluid would simmer off.
And now...back to the oven.

Two and a half hours had definitely reduced the amount of fluid in the casserole and the smell was incredible. If I had written the recipe I would have just stirred the onions and the mushrooms into the casserole and served it....Julia gets a little finicky here in my opinion, but, we were determined to do whatever she said.
 When the meat is tender, pour the contents of the casserole into a sieve set over a saucepan. Wash out the casserole and return the beef and bacon to it. Distribute the cooked onions and mushrooms over the meat.
Skim fat off sauce.
Ninth Problem. I never realized how many problems can be caused by 4 little words. You'll notice that after much debate we had already deviated by using a colander instead of a sieve. I didn't have a sieve large enough to tackle the contents of the pot. We thought about lining the colander with muslin, but fatigue was getting to us so we just dumped and strained. That left us with a pan of yummy sauce that I was supposed to skim the fat off. Not the easiest trick. Now would have been a great time to pull out a fancy gravy separator, but I didn't own one. I tried scooping with a spoon. I thought of sucking up fat with a turkey baster but in the end we decided fat equaled flavor and we would just have to deal with it.
 Simmer sauce for a minute or two, skimming off additional fat as it rises. You should have about 2 1/2 cups of sauce thick enough to coat a spoon lightly. If too thin, boil it down rapidly. If too thick, mix in a few vegetables of stock or canned bouillon. Taste carefully for seasoning. Pour the sauce over the meat and vegetables.
That sauce, even with the globules of fat glistening in the light of the camera flash tasted incredible.
All the recipe needed was to be plated with some boiled potatoes.
Tenth Problem. Even though we had picked up some potatoes at the store we realized when we were unpacking that we never purchased any. We had a brief window of time while the onions and mushrooms were cooked and before the stew was due out of the oven to run to the local ghetto H.E.B. to pick some up. Their potatoes were not particularly wonderful, but I didn't care by this time.
We quickly brought them home, boiled them and then drenched them with melted butter.

It tasted incredible and was very rich. Would I make it again? Probably not as their must be easier ways to make what is really just a fancy beef stew. As a matter of curiosity I looked at the Cook's Illustrated version of Boeuf Bourguignon and it was so complex it made Julia's look like the recipe for a ham sandwich.
Cooking your way through the two Cook's Illustrated Cookbooks? Now there would be a challenge!!!
Knowing that some of the best cooking experiences are shared I called my culinary pal Paul and asked him to cook along with me.
Remove rind, and cut bacon into lardons. Simmer rind and bacon for 10 minutes in 1 1/2 quarts of water. Drain and dry. Preheat oven to 450 degrees
First problem, locating a 6 oz chunk of bacon for making lardons. Paul and I went to Revival Market in town and told them what we were doing and they presented us with a vacuum packed packet of lardons. There was slightly more than the recipe called for, but everything is better with extra bacon right? Second problem. The rind was all cut together in the lardons and would have taken forever for us to trim each piece. Never mind, into the pot it went to simmer....we weren't sure why we were simmering (and Julie Powell thinks this step is superfluous) but into the water it went, and quickly the kitchen smelled yummy.
Saute the bacon in the oil over a moderate heat for 2 to 3 minutes to brown lightly. Remove to a side dish with a slotted spoon. Set casserole aside. Reheat until fat is almost smoking before you saute the beef.
Third problem. We didn't notice that although you simmer the bacon lardons and the rind, when it comes time to saute it you only saute the bacon and not the rind. Ours was still attached. Oh well on we go.
Dry the beef in paper towels; it will not brown if it is damp. Saute it, a few pieces at a time, in the hot oil and bacon fat until nicely browned on all sides. Add it to the bacon.

3lbs of either rump pot roast, chunk pot roast, top round or bottom round. Again, not cuts that were easily available. We talked with the helpful butcher at Revival market and he gave us a wonderful slab of prime cow.
I carefully took a ruler to make sure that the cubes were 2-inch cubes as specified by Julia in the recipe. They looked huge! This was far larger than most cubes of meat that you would put in a casserole. Never mind we thought we will get on YouTube and check the video of Julia Child teaching the dish to confirm.
Fourth Problem. There are many videos of people making Julia Child's recipe on YouTube, but none of them were Julia so we were unable to check with the source. After some frantic Internet searching we eventually located a clip of her that was hosted on a Russian Internet site...I'm kind of afraid what viruses my computer may have picked up, but we were determined to cook like Julia and not even the Cyrillic language would deter us!

Browning cubes of beef that large took forever but when mixed together with the bacon the aroma was wonderful and the dish was beginning to take shape.

While I tried to avoid splattering myself with hot bacon fat and oil. Paul masterfully wielded a knife over the vegetables. Only 1 onion and 1 carrot go in the pot. An amount that seemed remarkably small.

In the same fat, brown the sliced vegetables. Pour out the sauteing fat.

Return the beef and bacon to the casserole and toss with the salt and pepper. Then sprinkle on the flour and toss again to coat the beef lightly with the flour. Set casserole uncovered in middle position of preheated oven for 4 minutes. (This browns the flour and covers the meat with a light crust.) Remove casserole, and turn oven down to 325 degrees.
Stir in the wine, and enough stock or bullion so that the meat is barely covered. Add the tomato paste, garlic, herbs, and bacon rind. Bring to simmer on top of the stove. Then cover the casserole and set in lower third of preheated oven. Regulate heat so liquid simmers very slowly for 2 1/2 to 3 hours. The meat is done when a fork pierces it easily.
Fifth Problem. Julia's recipe may have been revolutionary at the time for its level of detail, but by today's standards it is frustratingly vague. It was difficult to tell at what point the vegetables were added to the beef and bacon. Should this be before the addition of the flour and the 4 minute bake or afterwards. As the only pot Julia mentions in her instructions is the fireproof casserole we assumed before, but it was at this stage we panicked because the recipe said add the rind, and of course it had been in there all along. Ooops!

At this stage in the recipe you would think that you could put up your feet and finish the rest of the bottle of wine you have just opened, but no! Julia Child has us use our time by preparing Champignons Sautes Au Beurre and Oignons Glaces A Brun so that when the casserole has finished you can mix it all together.

 Toss the shallots or green onions with the mushrooms. Saute over moderate heat for 2 minutes.
Seventh Problem. Hang on a second Julia. Do I finish sauteing the mushrooms first or do I add the shallots 2 minutes before they are ready? Solution. Get Paul to deal with the mushrooms while I work on the pearl onions...oh and if I remember it correctly I think we omitted the shallot as the recipe said it was optional :)
Julia calls for 18-24 peeled white onions about 1 inch in diameter. Determined to be as authentic as possible we scorned the prospect of frozen peeled pearl onions and purchased fresh. Bad idea. They took forever to peel!
When butter and oil are bubbling in the skillet, add the onions and saute over moderate heat for about 10 minutes, rolling the onions about so they will brown as easily as possible. Be careful not to break their skins. You cannot expect to brown them uniformly.

Having delegated the mushrooms to Paul, I figured I had better tackle the onions. The process was actually fairly simple though they were harder than imagined to get browned on all sides.
Pour in the liquid, season to taste, and add the herb bouquet. Cover and simmer slowly for 40 to 50 minutes until the onions are perfectly tender but retain their shape, and the liquid has evaporated. Remove herb bouquet.

Oh yes, we also made the bouquet garni ourselves. Our dedication to this recipe is getting ludicrous.


Eighth Problem - Well less of a problem, more like a mistake due to fatigue. Julia's recipe here calls for 1/2 cup of brown stock, or red wine. We had some of both left so we figured we would add both, but instead of adding 1/4 cup of each we inadvertently added 1/2 cup of each, doubling the amount of fluid! When we realized what we had done we just removed the cover from the onions early and prayed that the extra fluid would simmer off.
And now...back to the oven.

Two and a half hours had definitely reduced the amount of fluid in the casserole and the smell was incredible. If I had written the recipe I would have just stirred the onions and the mushrooms into the casserole and served it....Julia gets a little finicky here in my opinion, but, we were determined to do whatever she said.

Skim fat off sauce.
Ninth Problem. I never realized how many problems can be caused by 4 little words. You'll notice that after much debate we had already deviated by using a colander instead of a sieve. I didn't have a sieve large enough to tackle the contents of the pot. We thought about lining the colander with muslin, but fatigue was getting to us so we just dumped and strained. That left us with a pan of yummy sauce that I was supposed to skim the fat off. Not the easiest trick. Now would have been a great time to pull out a fancy gravy separator, but I didn't own one. I tried scooping with a spoon. I thought of sucking up fat with a turkey baster but in the end we decided fat equaled flavor and we would just have to deal with it.

That sauce, even with the globules of fat glistening in the light of the camera flash tasted incredible.
All the recipe needed was to be plated with some boiled potatoes.
Tenth Problem. Even though we had picked up some potatoes at the store we realized when we were unpacking that we never purchased any. We had a brief window of time while the onions and mushrooms were cooked and before the stew was due out of the oven to run to the local ghetto H.E.B. to pick some up. Their potatoes were not particularly wonderful, but I didn't care by this time.
We quickly brought them home, boiled them and then drenched them with melted butter.

It tasted incredible and was very rich. Would I make it again? Probably not as their must be easier ways to make what is really just a fancy beef stew. As a matter of curiosity I looked at the Cook's Illustrated version of Boeuf Bourguignon and it was so complex it made Julia's look like the recipe for a ham sandwich.
Cooking your way through the two Cook's Illustrated Cookbooks? Now there would be a challenge!!!
Sunday, November 13, 2011
Eggnog-Stuffed Cookies....attempt at your peril
I enjoy cooking. That should be apparent to any regular readers of my blog. I fiddle around in the kitchen the same way some people tinker with car engines. I firmly believe that home cooked food will taste better than something that is prepackaged, injected with preservatives and has sat on a grocery store shelf for too long. Some things just taste better fresh.
There are however certain foods that it is better to buy than make. Bagels and Doughnuts spring to mind. I've made bagels and they were ok, but the amount of effort expended was in my opinion too great for the quality of the product. Doughnuts scare me because of all that hot oil. I've only just gotten my stove completely repaired after the great Jalapeno Jelly Explosion of 2009.
I was lulled into a false sense of security by a recipe in this month's Food and Wine Magazine for Eggnog Stuffed Cookies. They sounded delicious, and I had some eggnog in the fridge. I thought this would be a great new cookie to do the rounds at all the Christmas Parties I attend (all 2 of them lol)
little did I know the terror that would ensue hidden within 1 deceptively simple instruction.
Filling
4 ounces cream cheese, softened
1 1/4 cups confectioner's sugar
1 1/2 tablespoons prepared eggnog
1/8 teaspoon fresh grated nutmeg
1/8 teaspoon cinnamon
Cookies
1 1/2 cups all-purpose flour
1/2 cup cornstarch
1 teaspoon ground ginger
1/2 teaspoon baking powder
1/4 teaspoon salt
1 teaspoon cinnamon
2 1/2 sticks unsalted butter, softened
1/3 cup packed dark brown sugar
3 large egg yolks
2 teaspoons dark molasses
Confectioner's sugar, for dusting.
Make the filling
1. In a medium bowl, using an electric mixer at low speed, beat the softened cream cheese with the confectioner's sugar, eggnog, nutmeg and cinnamon. Freeze the filling until firm, about 30 minutes.

Make the cookie dough
2. Line 2 baking sheets with parchment paper. In a medium bowl, whisk the flour with the cornstarch, ground ginger, baking powder, salt and cinnamon.
3. In a large bowl using the electric mixer, beat the softened butter with the the brown sugar at medium speed until fluffy. Beat in the egg yolks and molasses.
4. Add the dry ingredients and beat at low speed until they are incorporated. Using a 2 tablespoon-size scoop, scoop 24 mounds of the dough onto the baking sheets and refrigerate until the dough is slightly firm, about 30 minutes.

5. Preheat the oven to 325F
6. Working with one baking sheet at a time, using floured hands, press a deep hollow in the center of each mound of dough and spoon in a level teaspoon of the cream cheese filling. Pinch the tops closed, creating a 'kiss'; be sure to seal any cracks or holes. Repeat with the remaining dough and filling. Refrigerate until the cookies are firm, about 15 minutes.


7. Bake the cookies in the upper and lower thirds of the oven for about 30 minutes, until they are golden and the tops lightly cracked; shift the sheets from top to bottom and front to back halfway though baking.
 8. Transfer the baking sheets to racks and let the cookies cool completely. Dust the tops of the cookies with confectioner's sugar before serving.

Makes 2 dozen cookies....well that's the theory :(
The problem as you can see was step 6. After the dough had sat in the fridge for 30 minutes it was too cold to mold and cracked when I tried to make the deep hollow. When the dough warmed up and softened it was too soft and pliable to shape with any ease. I eventually developed a bit of a technique, but I felt like I was back in high school art class trying to shape a very soft lump of clay. It is not easy to encase a soft filling inside a soft dough.
One confession that may have added to the difficulty. When I went to my pantry I discovered that I didn't have any dark brown sugar, only light brown. A quick search on the Internet said that you could substitute light for dark if you added some molasses - 1 tablespoon of molasses per cup of light brown sugar. I therefor added an extra teaspoon of molasses to the recipe, but I did increase the flour just slightly to balance the extra teaspoon of liquid.
How do they taste? In the cookies I baked the ratio of cookie to filling was not great enough. The cookie tasted great but felt too dry. It needs enough filling in each cookie to be in every bite, but as the dough is so fragile this seems almost impossible to do without lots of practice...
...and I have far more important things to do than practice stuffing cookies.
There are however certain foods that it is better to buy than make. Bagels and Doughnuts spring to mind. I've made bagels and they were ok, but the amount of effort expended was in my opinion too great for the quality of the product. Doughnuts scare me because of all that hot oil. I've only just gotten my stove completely repaired after the great Jalapeno Jelly Explosion of 2009.
I was lulled into a false sense of security by a recipe in this month's Food and Wine Magazine for Eggnog Stuffed Cookies. They sounded delicious, and I had some eggnog in the fridge. I thought this would be a great new cookie to do the rounds at all the Christmas Parties I attend (all 2 of them lol)
little did I know the terror that would ensue hidden within 1 deceptively simple instruction.
Filling
4 ounces cream cheese, softened
1 1/4 cups confectioner's sugar
1 1/2 tablespoons prepared eggnog
1/8 teaspoon fresh grated nutmeg
1/8 teaspoon cinnamon
Cookies
1 1/2 cups all-purpose flour
1/2 cup cornstarch
1 teaspoon ground ginger
1/2 teaspoon baking powder
1/4 teaspoon salt
1 teaspoon cinnamon
2 1/2 sticks unsalted butter, softened
1/3 cup packed dark brown sugar
3 large egg yolks
2 teaspoons dark molasses
Confectioner's sugar, for dusting.
Make the filling
1. In a medium bowl, using an electric mixer at low speed, beat the softened cream cheese with the confectioner's sugar, eggnog, nutmeg and cinnamon. Freeze the filling until firm, about 30 minutes.

(It doesn't look that appetizing, but trust me, it tastes great)
2. Line 2 baking sheets with parchment paper. In a medium bowl, whisk the flour with the cornstarch, ground ginger, baking powder, salt and cinnamon.
3. In a large bowl using the electric mixer, beat the softened butter with the the brown sugar at medium speed until fluffy. Beat in the egg yolks and molasses.
4. Add the dry ingredients and beat at low speed until they are incorporated. Using a 2 tablespoon-size scoop, scoop 24 mounds of the dough onto the baking sheets and refrigerate until the dough is slightly firm, about 30 minutes.

5. Preheat the oven to 325F
6. Working with one baking sheet at a time, using floured hands, press a deep hollow in the center of each mound of dough and spoon in a level teaspoon of the cream cheese filling. Pinch the tops closed, creating a 'kiss'; be sure to seal any cracks or holes. Repeat with the remaining dough and filling. Refrigerate until the cookies are firm, about 15 minutes.


(This is where all hell broke loose!)

(My 2 dozen cookies somehow became 19)
7. Bake the cookies in the upper and lower thirds of the oven for about 30 minutes, until they are golden and the tops lightly cracked; shift the sheets from top to bottom and front to back halfway though baking.


Makes 2 dozen cookies....well that's the theory :(
The problem as you can see was step 6. After the dough had sat in the fridge for 30 minutes it was too cold to mold and cracked when I tried to make the deep hollow. When the dough warmed up and softened it was too soft and pliable to shape with any ease. I eventually developed a bit of a technique, but I felt like I was back in high school art class trying to shape a very soft lump of clay. It is not easy to encase a soft filling inside a soft dough.
One confession that may have added to the difficulty. When I went to my pantry I discovered that I didn't have any dark brown sugar, only light brown. A quick search on the Internet said that you could substitute light for dark if you added some molasses - 1 tablespoon of molasses per cup of light brown sugar. I therefor added an extra teaspoon of molasses to the recipe, but I did increase the flour just slightly to balance the extra teaspoon of liquid.
How do they taste? In the cookies I baked the ratio of cookie to filling was not great enough. The cookie tasted great but felt too dry. It needs enough filling in each cookie to be in every bite, but as the dough is so fragile this seems almost impossible to do without lots of practice...
...and I have far more important things to do than practice stuffing cookies.
Saturday, September 10, 2011
Lime and Candied Jalapeno Cupcakes
This recipe started out as a random conversation at Game Night with my friend Paul. I then freely adapted a recipe from Betty Crocker to make this cupcakes. They are rather unique!


Cupcakes
1 box super moist lemon cake mix
1 box (4 serving size) lime-flavored Jello
3/4 cup water
1/3 cup lime juice
1/3 cup vegetable oil
3 eggs
Zest of a lime
Glaze
1 cup powdered sugar
2 -2 1/2 tablespoons lime juice
Frosting
1 package (8 oz) cream cheese, softened
1/4 cup butter, softened
3 1/2 cups powdered sugar
1 tablespoon lime juice
1/4 cup candied Jalapenos (see note below)
1. Heat the oven to 350F. Place cupcake liners in 24 regular sized muffin cups.
2. In a large bowl mix together the lemon cake mix and the lime jello. Add the Lime zest, the 3 eggs, the water and the lime juice. Mix on low for about 30 seconds then on medium for about 2 minutes, scraping the bowl occasionally.
3. Divide the batter evenly among the muffin cups filling each one 2/3 full (approximately 3 tablespoons of batter)
4. Bake 19 to 24 minutes or until a toothpick inserted in the center comes out clean. I recommend rotating the trays and switching racks halfway through the baking time.
5. Cool in the pan for 10 minutes and then put the cupcakes on wire racks. With a toothpick or wooden skewer, pierce the tops of the cupcakes in several places.
6. In a small bowl mix together the glaze ingredients until the glaze is smooth and thin enough to drizzle. Drizzle and spread the glaze over the cupcakes and allow to cool completely (about 30 minutes)
7. Drain and rinse 1/4 cup of candied jalapenos (see note below). Place them in a food processor and blitz till chopped finely. Add the butter and the cream cheese and run until smooth.
8. Add the powdered sugar 1/2 cup at a time and then frost the cupcakes. Place a single candied jalapeno slice on top of each cupcake.
Notes
I used Buc-ee's Candied Jalapenos for this recipe. If you cannot find them there are various recipes to make them yourself on the web, but I cannot guarantee their efficacy.
I used 1/4 cup of jalapenos to just give the frosting a slight afterglow. Obviously you can add more if you wish a hotter cupcake.
I would normally make the cupcakes from scratch rather than use a box mix, but a) I was feeling lazy today and b) I was curious to see how the Lime Jello and Lemon Cake box mix adaptation worked.

So, the all important question, how do they taste? Like lime cupcakes with just a subtle hint of warmth, I'm probably not the best judge of this as a) I like things spicy and b) I have a dull sense of taste so my 'nicely spiced' is somebody else's 'holy crap this is hot!!!!!' Personally I think I should have increased the amount of candied jalapeno in the icing to at least 1/3 cup. I'll see what everyone else says at the party tonight.
Saturday, August 27, 2011
He needs a recipe to make toast!
I've often heard the phrase 'He needs a recipe to make toast.' along with it's companion phrase 'When she boils water, she burns it.' as ways of insulting somebody's culinary prowess. Consequently the idea of posting any kind of recipe for toast is an odd one, so take what follows as a suggestion for a very specific purpose.
I am currently making Ricotta in the kitchen. See the recipe here.

I'm taking it to a party tonight (along with a Caprese Salad), and I wanted some little toast rounds to serve it upon.

So for the cost of a 99 cent baguette, I made these :)
Preheat the oven to 350F
Slice the baguette thinly
in a small bowl mix olive oil, garlic powder and Italian seasoning (and salt if the Italian seasoning doesn't already have it)
Brush each side of each slice with the olive oil mixture and place on a wire baking rack stood inside a rimmed baking sheet (covered in foil for easy clean up)
Bake 10-15 minutes, until lightly browned. Then let cool.

These will be served tonight with the Ricotta.
Tasty and cheaper than purchasing pre-toasted slices ( I see them for sale at the store but have never yet seen anyone buy them!)
Yum
Saturday, July 30, 2011
Baking Rainbow Cakes in a Jar
A friend posted this recipe on facebook on how to bake cakes in Mason Jars. I decided to give it a go and give them the full rainbow treatment that the recipe suggests.
As I knew the dying of the icing and the filling of the jars would be time consuming I opted to cut some corners by using box cake mix and ready made icing...I know this goes against everything I believe in, but sometimes you just gotta go for expediency over principles. I'm sure they would taste better if I had made my own cake batter, but the primary gimmick is the appearance here anyway.
The first challenge is working out how to split a large amount of cake batter into 6 equal portions.
Here's how I did it - a digital scale that you can zero will be your friend.

First lesson learned - The math would have been easier and more accurate if I had used Grams and Kilos rather than pounds and ounces. A gram is a smaller unit than an ounce so you get a more accurate reading...also, the smallest unit my scale would read is 1/8 oz. Working out what 11.6oz was (11 and 6 tenths) when you can only measure in 8ths was a challenge. I went with 11 and 5/8 to approximate.
Next I needed to color all 6 batters.
Gel food coloring is preferable to liquid as it won't change the consistency of your batter that much. I bought a pack of 4 colors - red, yellow, green and blue because I figured I could mix orange and purple to get the 6 colors I needed. As you can see from the picture this was only partially successful.

Orange was not difficult to mix, but I found getting the red an intense enough color took a lot of gel and I was concerned about having enough left to mix the purple. Little did I realize that mixing purple would be the bane of my existence!
Second Lesson Learned - I bought the 4 color pack to save money. I could have bought each of the colors already mixed in gel form. My red would have probably been more intense if I'd done this and my purple might have actually looked purple. If you are not confident in your color mixing skills buy them ready mixed.The colors looked muted after baking (see pics below) so the more intense they are at this stage the better.
The next stage is filling the jars with the 6 layers. I was concerned about how I could split the batter. evenly among the 6 containers so I resorted to math again.

The recipe said to fill the jars 3/4 full. Mine were slightly fuller than that and I had a little batter left over. I knew from the recipe that they would rise to a domed top and I would have to cut some off the top before icing so I wasn't too worried.
After 40 minutes in the oven I was greeted by this.

Third Lesson Learned - 3/4 means 3/4. My division of the batter was even, but it was still too much for the size of the jar. The tray of water that the glasses stands in catches any mess, but I did have some dribble down the side of the glasses and some batter wasted. I think if I'd been a little less liberal with my filling I might have stretched the recipe to fill 7 jars rather than 6. It's not a huge deal as I have to cut off the tops anyway, but an extra jar might have been nice.
The trimming of the cakes once they had cooled was a relatively simple affair. It's helpful to have someone else with you so that you don't gorge on all the spare cake yourself.

Icing them is a simple task.

Now all I have to do is put the lids on, stick some circular labels in the lids and maybe tie a few ribbons for added fun.
Fourth Lesson Learned - The leftover cake that I cut off goes really well with the leftover icing :)
As I knew the dying of the icing and the filling of the jars would be time consuming I opted to cut some corners by using box cake mix and ready made icing...I know this goes against everything I believe in, but sometimes you just gotta go for expediency over principles. I'm sure they would taste better if I had made my own cake batter, but the primary gimmick is the appearance here anyway.
The first challenge is working out how to split a large amount of cake batter into 6 equal portions.
Here's how I did it - a digital scale that you can zero will be your friend.
- Weigh your empty mixing bowl - mine was 1 lb 9oz
- Weigh your mixing bowl full of batter - 5 lb 15 oz
- Total weight of batter = 5lb 15oz minus 1 lb 9 oz = 4lbs 6oz
- Six equal portions of batter will be 4 lb 6 oz divided by 6 which is 11.6 oz
- Put your empty bowl on the scales and add 11.6 oz of batter...repeat until all 6 bowls are filled.

First lesson learned - The math would have been easier and more accurate if I had used Grams and Kilos rather than pounds and ounces. A gram is a smaller unit than an ounce so you get a more accurate reading...also, the smallest unit my scale would read is 1/8 oz. Working out what 11.6oz was (11 and 6 tenths) when you can only measure in 8ths was a challenge. I went with 11 and 5/8 to approximate.
Next I needed to color all 6 batters.
Gel food coloring is preferable to liquid as it won't change the consistency of your batter that much. I bought a pack of 4 colors - red, yellow, green and blue because I figured I could mix orange and purple to get the 6 colors I needed. As you can see from the picture this was only partially successful.

Orange was not difficult to mix, but I found getting the red an intense enough color took a lot of gel and I was concerned about having enough left to mix the purple. Little did I realize that mixing purple would be the bane of my existence!
Second Lesson Learned - I bought the 4 color pack to save money. I could have bought each of the colors already mixed in gel form. My red would have probably been more intense if I'd done this and my purple might have actually looked purple. If you are not confident in your color mixing skills buy them ready mixed.The colors looked muted after baking (see pics below) so the more intense they are at this stage the better.
The next stage is filling the jars with the 6 layers. I was concerned about how I could split the batter. evenly among the 6 containers so I resorted to math again.
- I have 11.6 oz of each color cake batter
- 11.6 divided by 6 is approximately 1 and 7/8 oz in each jar.

The recipe said to fill the jars 3/4 full. Mine were slightly fuller than that and I had a little batter left over. I knew from the recipe that they would rise to a domed top and I would have to cut some off the top before icing so I wasn't too worried.
After 40 minutes in the oven I was greeted by this.

Third Lesson Learned - 3/4 means 3/4. My division of the batter was even, but it was still too much for the size of the jar. The tray of water that the glasses stands in catches any mess, but I did have some dribble down the side of the glasses and some batter wasted. I think if I'd been a little less liberal with my filling I might have stretched the recipe to fill 7 jars rather than 6. It's not a huge deal as I have to cut off the tops anyway, but an extra jar might have been nice.
The trimming of the cakes once they had cooled was a relatively simple affair. It's helpful to have someone else with you so that you don't gorge on all the spare cake yourself.

Icing them is a simple task.

Now all I have to do is put the lids on, stick some circular labels in the lids and maybe tie a few ribbons for added fun.
Fourth Lesson Learned - The leftover cake that I cut off goes really well with the leftover icing :)
Monday, May 23, 2011
God and Wham!
My brain woke up in an unusual state this morning (well probably every morning). I am reading How (Not) to Speak of God by Peter Rollins and when I went to bed last night I read this passage:
The term (idolatry) can be understood to refer to any attempt that would render the essence of God accessible, bringing God into either aesthetic visibility (in the form of a physical structure, such as a statue) or conceptual visibility (in the form of a concept, such as a theological system). Like an aesthetic idol (such as the Golden Calf in the book of Exodus), the conceptual idol refers to any system of thought which the individual or community takes to be a visible rendering of God. The only significant difference between the aesthetic idol ad the conceptual idol lies in the fact that the former reduces God to a physical object while the latter reduces God to an intellectual object. ~ Page 12
I slept with that passage rattling around in m brain, and woke this morning with that passage still processing, and along side it my brain was singing the following song:
Rhonda: Yeah, why don't you guys get married!
Adam: I don't even know if he's gay.
Rhonda: He's got like frosted hair.
Adam: George Michael has frosted hair and he's like totally straight.
But I digress :)
When the news that George Michael was gay filtered out to the general public I remember many girls who refused to believe it. They believed that if the right girl came along he could be reformed (and most of them cast themselves in the role of his savior). Their concept of George Michael had become an idol that the clung onto even in the midst of conflicting evidence.
Peter Rollins goes on to say:
Western theology has all too often reduced the beautifully varied and complex descriptions of God found in the bible to a singular reading that does violence to its vibrant nature. The bible itself is a dynamic text full of poetry, prose, history, law and myth all clashing together in a cacophony of voices. We are presented with a warrior God and a peacemaker, a God of territorial allegiance and a God who transcends all territorial divides, an unchanging God and a God who can be redirected, a God of peace and a God of war, a God who is always watching the world and a God who fails to notice the oppression against Israel in Egypt. ~ Page 13
It surprises me how often people talk with absolute certainty about Divine Mystery. My experience of God has gotten so much larger as I journey through life, and many conceptual idols have been smashed along the way. For a description of one of my recent idols being smashed read this post here.
So there it is, God and Wham combined in one blog post.
Proof of my insanity?
The term (idolatry) can be understood to refer to any attempt that would render the essence of God accessible, bringing God into either aesthetic visibility (in the form of a physical structure, such as a statue) or conceptual visibility (in the form of a concept, such as a theological system). Like an aesthetic idol (such as the Golden Calf in the book of Exodus), the conceptual idol refers to any system of thought which the individual or community takes to be a visible rendering of God. The only significant difference between the aesthetic idol ad the conceptual idol lies in the fact that the former reduces God to a physical object while the latter reduces God to an intellectual object. ~ Page 12
I slept with that passage rattling around in m brain, and woke this morning with that passage still processing, and along side it my brain was singing the following song:
I spent much of the day trying to forge a connection between these seemingly two unrelated topics.
The way I understand what Peter Rollins was saying is that we need to be careful about how we think about God. Our very belief about how we believe in God can become an idol that can distance us from God. We cling to our own particular concept of God even in the face of conflicting evidence.
Looking at this Wham video from 1984 it's hard to believe that anyone missed the fact that George Michael was Gay, but at the time the possibility never entered mine, or any of my friends brains. He dressed trendily and consequently many of the girls at my school were into him. The thought that he might be anything different to the image that we saw presented seemed impossible. Like the hidden arrow in the FedEx logo, we failed to see what was right before our eyes.
Incidentally this view of George Michael was wonderfully captured in the movie Adam & Steve. Adam sees Steve dancing onstage at a nightclub in 80s New York, his friend Rhonda tries to persuade him to go talk to him.
Rhonda: What's with that solid gold dancer with his ass in the air?
Adam: The dazzle dancer? Rhonda: Yeah, why don't you guys get married!
Adam: I don't even know if he's gay.
Rhonda: He's got like frosted hair.
Adam: George Michael has frosted hair and he's like totally straight.
But I digress :)
When the news that George Michael was gay filtered out to the general public I remember many girls who refused to believe it. They believed that if the right girl came along he could be reformed (and most of them cast themselves in the role of his savior). Their concept of George Michael had become an idol that the clung onto even in the midst of conflicting evidence.
Peter Rollins goes on to say:
Western theology has all too often reduced the beautifully varied and complex descriptions of God found in the bible to a singular reading that does violence to its vibrant nature. The bible itself is a dynamic text full of poetry, prose, history, law and myth all clashing together in a cacophony of voices. We are presented with a warrior God and a peacemaker, a God of territorial allegiance and a God who transcends all territorial divides, an unchanging God and a God who can be redirected, a God of peace and a God of war, a God who is always watching the world and a God who fails to notice the oppression against Israel in Egypt. ~ Page 13
It surprises me how often people talk with absolute certainty about Divine Mystery. My experience of God has gotten so much larger as I journey through life, and many conceptual idols have been smashed along the way. For a description of one of my recent idols being smashed read this post here.
So there it is, God and Wham combined in one blog post.
Proof of my insanity?
Friday, May 20, 2011
Cuban Pork
Occasionally I like to do something really over the top in the kitchen just for the sheer fun of it.
Today I made Cuban pork
Make a marinade out of Orange Juice, Olive Oil, White Vinegar, Garlic, Cumin, Oregano, Salt and Pepper and smear it all over a pork shoulder and let it sit for 2 hours.
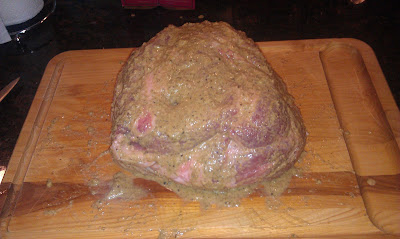 Make sure you put 1 inch slits all over the pork so that the marinade can penetrate.
Then roast in a slow oven for 6 hours, and then let rest for another hour before you can eat and enjoy.

I'm serving this with Black Beans that have simmered with a Ham Hock and various herbs and spices for 2 hours and also some rice.
The leftover pork will become Empanadas on Saturday and reappear with pasta on Sunday!!!!
Today I made Cuban pork
Make a marinade out of Orange Juice, Olive Oil, White Vinegar, Garlic, Cumin, Oregano, Salt and Pepper and smear it all over a pork shoulder and let it sit for 2 hours.

Then roast in a slow oven for 6 hours, and then let rest for another hour before you can eat and enjoy.

I'm serving this with Black Beans that have simmered with a Ham Hock and various herbs and spices for 2 hours and also some rice.
The leftover pork will become Empanadas on Saturday and reappear with pasta on Sunday!!!!
Wednesday, April 13, 2011
Milestones of Masculinity?
I wrote this following post back in 2007 when I was blogging on Myspace....a conversation after staff worship yesterday brought it to mind (don't ask!) so I thought I would re post it here. If talk of male underwear offends you, quit reading now.
I've just returned from the store where I've just purchased my first jock strap. I'm 39 and never experienced this rite of passage before.
I'm going to a costume party tomorrow night and as part of my costume I need to wear white trousers - pants for you speakers of 'American English' (though isn't 'American English' an oxymoron? But I digress). All I have at home are colored boxer shorts and although I have the fashion sense of a circus clown even I know that colored boxers will show though and create an unexpected comic slant to the costume. This knowledge left me with 2 options a) Purchase new underwear or b) Go commando
Well 'b' is not really an option for me. I've been commando once in my life through circumstances way too embarrassing to blog about here and I have absolutely no desire to do it again. Consequently I had to put the plastic to good use and purchase a new garment. Weighing up my underwear options I was left with a) Whitey Tighties b) White Y fronts c) White boxers or d) a white jock strap.
Well Whitie Tighties are a no go for me. Suffice to say I'm a boxers rather than briefs guy. White Y fronts would be possible but those are what I wore as a kid before I discovered the freedom of boxers. Going back and slipping on a pair of those (why do we refer to them in the plural? A pair?) would feel like regressing to childhood. What next? Disposable diapers or terry cloth and pins? White boxer shorts are not that readily available - so off to the sporting goods store.
Now to be perfectly honest there are lots of other options available to me, but I must confess a certain curiosity about the humble jock strap. Growing up in the U.K. this mighty garment of the American High School locker room was never seen. Never. My knowledge of Jock Straps has all been garnered from American High School Movies - mainly John Hughes films, and one highly guilt ridden viewing of 'Porkys'.
As I drove to the store this morning I found myself wondering if a boy's first jock strap (or as the packaging calls it 'Under Armor') is one of those marks of maturity. Do dads take their sons shopping in the same way mothers go with their daughters to purchase their first training bra? This garment must be important, it even has its own entry in Wikipedia!
All this philosophical musings came to an abrupt halt when I realized that I would have to hand this to the checker and pay for it. Now, I don't have the body of a sporting demi-god and so I began to panic that she would smile at me, see my purchase, and then call all the other checkers over to ridicule this fat hairy Englishman buying a garment for obviously '....illicit purposes as he can't possibly be the sporting type' except for maybe competitive darts and if you need under armor for that you obviously have some difficulties with your aim!
Why do I care so much what other people think? Well when I was a boy my parent's method of discipline involved a lot of shame. My brother and I were never hit; instead comments like "People around here know what you've done and what you are really like!" were often uttered. Consequently my brother and I imagined a huge invisible crowd of people watching our every move and we lived in fear of being found out.
I'm still working though my issue of caring too much what other people think. The church I grew up in added to that image by painting for me a God who is leaning forward on His cloud watching my every move waiting for me to put a foot wrong so he could press the 'smite' button. St. Paul didn't help much either. In Hebrews 12:1 he says 'Therefore since we are surrounded by such a cloud of witnesses....' Paul paints an image of the heroes of the faith looking down upon us and cheering us on, but I always had a nagging suspicion that in my case they were shaking their heads in shame and embarassment because they see 'what I'm really like'.
I'm learning to not care so much about what people think. In fact, me writing an entire blog about Jock Straps (or for you delicate types - Under Armor) and posting it where almost anyone can read it is one more step in my healing. Some of you might consider this blog 'inappropriate' in someway. And it's ok if you do - as in the same way that it's ok that I think the whole thing is actually kind of funny.
So, tomorrow night is the costume party - I'll post some pictures of me in costume soon. I will be able to attend secure in the knowledge that my underwear is not showing though my pants. There's just one problem though, how do you wear these stupid things???
Saturday, January 08, 2011
Quarters, Fives and Dimes - a Year of Boardgames
Like many of my fellow boardgame geeks I log when I play a game online here so that I can see trends. Now I played a lot of games(!) in 2010. I logged 382 plays of 173 games, so obviously there were some repeats. Games that reach the distinction of being played 5, 10 or 25 times become Quarters, Fives and Dimes. When you have as many different games as I have then each of the games that reach this honor must have something to distinguish them from the herd. Here's my take on the games of 2010. For the games of 2009 click here
Quarters
 Werewolf is my only quarter in 2010 with 27 plays, in fact it is my first quarter ever as no game came close in 2009. In 2009 I only managed 6 plays, so why the jump to 27 last year? The simple answer is Bering UMC game night. They have a once a month game night that some friends who attend that church invited me too. They wanted to introduce people to games outside the usual fare of Mexican Train, Rummikub and Uno. Werewolf is a great large group game - you need at least 8 people to play, and it is easy to learn so long as the Moderator has a good handle on the rules and a flair for drama :) It's become a staple of their game nights since I introduced it.
 Hive almost got there with 23 plays. This elegant 2 player game didn't even make it into rotation last year as I did not own a set. The bulk of plays happened in the first 8 months of last year - obviously something came along to remove it from popularity, or someone. Hive only plays 2 people, so whenever a third person appears it is removed from the table.
 Dominion had 17 plays last year which is down from 22 in 2009. It's fast, and has enough expansions to keep the game interesting. It may not have been number one in 2010, but the fact that it is still in the top 3 is a sign of a great game.

Animal Upon Animal is a simple children's dexterity game. I played this 13 times in 2010. Seven times on one day!!! It's amazing the things I will do to keep young children entertained.
 Fluch de Mumie is another awesome children's game that I managed 10 plays of. This one is fun to play with just adults too as it turns into an intriguing cat and mouse game of deduction as the mummy tries to locate the archaeologists who are stealing treasures from his pyramid.
Quarters
 Werewolf is my only quarter in 2010 with 27 plays, in fact it is my first quarter ever as no game came close in 2009. In 2009 I only managed 6 plays, so why the jump to 27 last year? The simple answer is Bering UMC game night. They have a once a month game night that some friends who attend that church invited me too. They wanted to introduce people to games outside the usual fare of Mexican Train, Rummikub and Uno. Werewolf is a great large group game - you need at least 8 people to play, and it is easy to learn so long as the Moderator has a good handle on the rules and a flair for drama :) It's become a staple of their game nights since I introduced it.
Dimes
Hive almost got there with 23 plays. This elegant 2 player game didn't even make it into rotation last year as I did not own a set. The bulk of plays happened in the first 8 months of last year - obviously something came along to remove it from popularity, or someone. Hive only plays 2 people, so whenever a third person appears it is removed from the table.Dominion had 17 plays last year which is down from 22 in 2009. It's fast, and has enough expansions to keep the game interesting. It may not have been number one in 2010, but the fact that it is still in the top 3 is a sign of a great game.
Animal Upon Animal is a simple children's dexterity game. I played this 13 times in 2010. Seven times on one day!!! It's amazing the things I will do to keep young children entertained.
Fluch de Mumie is another awesome children's game that I managed 10 plays of. This one is fun to play with just adults too as it turns into an intriguing cat and mouse game of deduction as the mummy tries to locate the archaeologists who are stealing treasures from his pyramid.Nickels
 Sticheln is a trick taking game that is wonderfully painful to play. Trump constantly changes every trick, and with most of the deck giving you negative points a positive score is very difficult to achieve. I managed 9 plays last year.
 Ascension is probably the game I am most surprised to see on this list. I managed 8 plays of this game which is surprising as I didn't even learn the game until Nov 19th! It's a cross between Dominion and Magic the Gathering.
 Tichu managed 8 plays last year. It's a great 4 player card game that takes a while to get your head around. It's one of the standard late night games at the boardgame convention that I attend every year. Last year I entered the tournament and sucked!!! But it's still great fun.
 Pitchcar is a silly game that involves flicking wooden cars around a racetrack. There's really not much else to say, easy to learn, and hilarious to play. I managed 7 plays last year.
 The Bucket King is a card game with surprising depth. The different animals on the farm all charge at different colored buckets. Your task is to keep your pyramid of buckets intact for as long as possible. I managed 7 plays of this game, 4 of which took place while on a vacation to Disney World :)
 Ta Yu is a nice 2 player game. You take turns laying tiles on a board trying to connect the two sides. The board hit the table 7 times in 2010
 Felix the Cat in the Sack is a Texas Hold em Variant transformed under the guise of bidding for a sack of unidentified cats! 5 plays for the curious felines in 2010
 Pass the Bomb is a light party game. It's amazing how blank your mind can go when you are trying to name words while holding a ticking bomb. The bomb got passed around 5 times in 2010.

Telestrations is a published version of the Telephone Game. The erasable books make the game easy to play and the fun is often not so much in who wins (indeed it's very difficult to score) but more in the silly progressions of the words. It's more of a fun activity than a game, but the important this is that it is fun - I received the game as a door prize at the Board game Convention in November, so the fact that it has managed 5 plays in a month and a half shows how much fun it is.
Fallen from Grace-games that had a minimum of 5 plays in 2009 that were not touched at all in 2010
Chains of Fenrir fell from the table as other games superseded it, but it has been played in 2011 so it's not beyond hope.
Duck Duck Go also disappeared from view in 2010 with zero plays.
Travel Blokus had 5 plays in one day in 2009 and has been gathering dust ever since.
Uno received 5 plays in 3 days due to a family vacation in 2009, it also has not hit the table since.
The Top Three
When I combine the data from both years, there are no real surprises.
Sticheln is a trick taking game that is wonderfully painful to play. Trump constantly changes every trick, and with most of the deck giving you negative points a positive score is very difficult to achieve. I managed 9 plays last year.Ascension is probably the game I am most surprised to see on this list. I managed 8 plays of this game which is surprising as I didn't even learn the game until Nov 19th! It's a cross between Dominion and Magic the Gathering.Tichu managed 8 plays last year. It's a great 4 player card game that takes a while to get your head around. It's one of the standard late night games at the boardgame convention that I attend every year. Last year I entered the tournament and sucked!!! But it's still great fun.Pitchcar is a silly game that involves flicking wooden cars around a racetrack. There's really not much else to say, easy to learn, and hilarious to play. I managed 7 plays last year.The Bucket King is a card game with surprising depth. The different animals on the farm all charge at different colored buckets. Your task is to keep your pyramid of buckets intact for as long as possible. I managed 7 plays of this game, 4 of which took place while on a vacation to Disney World :)Ta Yu is a nice 2 player game. You take turns laying tiles on a board trying to connect the two sides. The board hit the table 7 times in 2010Felix the Cat in the Sack is a Texas Hold em Variant transformed under the guise of bidding for a sack of unidentified cats! 5 plays for the curious felines in 2010Pass the Bomb is a light party game. It's amazing how blank your mind can go when you are trying to name words while holding a ticking bomb. The bomb got passed around 5 times in 2010.
Telestrations is a published version of the Telephone Game. The erasable books make the game easy to play and the fun is often not so much in who wins (indeed it's very difficult to score) but more in the silly progressions of the words. It's more of a fun activity than a game, but the important this is that it is fun - I received the game as a door prize at the Board game Convention in November, so the fact that it has managed 5 plays in a month and a half shows how much fun it is.
Fallen from Grace-games that had a minimum of 5 plays in 2009 that were not touched at all in 2010
Chains of Fenrir fell from the table as other games superseded it, but it has been played in 2011 so it's not beyond hope.
Duck Duck Go also disappeared from view in 2010 with zero plays.
Travel Blokus had 5 plays in one day in 2009 and has been gathering dust ever since.
Uno received 5 plays in 3 days due to a family vacation in 2009, it also has not hit the table since.
The Top Three
When I combine the data from both years, there are no real surprises.
Dominion has 39 plays.
Werewolf has 33 plays
Hive has 23
Most of these games can be purchased at thoughthammer.com though a few of them are out of print.
If you're looking for a game suggestion for a group, ask me :)
Tune in next year, for my gaming review!!!!
Subscribe to:
Posts (Atom)